HELP CENTRE
VIDEO Tutorials
The Simplest Ways to Create A Photobook with AllstarPhoto: https://youtu.be/f1J167a7DhY
Photobook Cover Design: https://youtu.be/li39mdhgnQg
How to Design a Photobook Page Spread Layout: https://youtu.be/NRH1BzfgE5k
Text Editing and Manipulation: https://youtu.be/wVvPRZgBefc
Background & Image Editing and Manipulation: https://youtu.be/UJ9kfSGR1l8
User account
Do I have to register to create and order a photo product?
You can start your project without registering – if you just want to browse around and check the editor capabilities, for example. However, in order to save your project you will need to open an account by registering. This way your project will be saved and stored in your personal Project Folder. Ready for you to continue working on it.
How do I find and access My Account?
In order to access your account with all your personal information, order history and your active projects please click on the Profile Photo Icon next to your user name.
My Project
How to start a project?
Please select a product you are interested in and click on the “Start Creating” button, or “Next” depending on the product type. You do not need to register in order to start creating your product. However, if you decide to save your project or order your personalised product you will have to create an account with us.
How to change the name of my project?
There are two ways of changing the name of your project:
- All products, except for Cards - You can change the name of the project as soon as you enter the editor. Simply click on the “pencil” icon next to the current name and give you project a new name, then hit the “Save” next to it.
- For all products – fully or part create your product and save it, the project will then be saved in “My Projects” folder under your account. In order to change the name of your existing project, please go to “My Projects” under your account, find the project that you wish to rename and click on the pencil icon next to the existing title. You are now able to change and save the new name of your project.
I would like to change the type of cover I have originally chosen for my project. How can I do this?
Unfortunately, it is not possible to change the type of cover for your photobook or yearbook once the project has been started.
Can I change the size of my product after I have started my project?
Unfortunately, due to technical limitations it is not possible to change the size of the product if you do not want to loose the changes you have made and start from the beginning.
Where do I find my saved projects?
All your saved projects are saved in the “MY PROJECTS” folder on "MY ACCOUNT" page. Click on the profile icon next to your user name to access all folders on "MY ACCOUNT" page.
How do I edit an existing project?
You can find all your existing project under your account in “MY PROJECTS” folder. Please click on the Profile icon next to your login name to access your account.
Can I re-order a product that I have already created and placed an order for?
Yes, you can.
If you wish to reorder your product without making any editorial changes, please go to ORDER HISTORY AND DETAILS under your account. You will find there a full list of your previous orders. On the right hand side by details of each product you have an option to reorder it. Press “Reorder” and the chosen product will be moved to the Cart.
If you wish to edit your product prior to reordering it, please go to MY PROJECTS folder under your account, find the product you wish to make changes to before reordering and choose “Duplicate” action in the last column. The duplicate product will be immediately added to your project list. Please select “Edit” action from the last column of the duplicate product. You can now edit and save your changes. You can also re-name the duplicate, if you wish.
How long will it take to deliver my product?
Photobooks and calendars are delivered within 5 working days and cards will be with you within 3 working days.
Yearbooks production time:
Paperback Yearbook - 5 working days
Laminated Hardback Yearbook – 10 working days
Leatherette Yearbook - 15 working days
Around the editor
Undo / Redo function
Undo - Allows you to undo your last action. You can also use the shortcut CTRL + Z
Redo - Allows you to redo your last action. You can also use the shortcut CTRL + Y
Why is the first and last page of the photobook contents not editable?
The left hand side of the first spread of pages in the book and the right side of the last spread of the book contents are the insides of the front and back cover in the paperback book, or the front and back endpapers in case of hardback books. These are left white and cannot be edited and printed on.
Are there any restrictions on adding text to the page?
Every photo product we sell has a safety margin implemented around all edges of the page (calendars, single sided and double sided cards) and all edges of the spread (photobooks and folded cards). If the text box is placed too close to the edge of the product the safety margin will become visible alarming you to the fact that your text is too close to the trim line.
Although there are no warnings to not to place text across 2 pages of the spread (through the middle), we strongly advise to never do that as some of the text will be hidden in the binding gutter.
Can I number pages in my project?
The editor does not have a function to automatically number the pages. However, you can number the pages manually by adding a text box to each page and typing the relevant page number in it.
How close to the page borders can I put my photos?
Unlike the text, you can put your photos right up to the edges of your project.
To determine how close your photo is to the actual trim line please use the “Show bleeds” function. You will find it under “MORE” in the Editor’s top toolbar.
If you want your photo to come right up to the edges of the page then you must use the “show bleed” function of the editor to ensure that you place enough of your photo on the outside of the cutting area so no unsightly white will be flashing on edges of the printed book.
However, if your photo is not to come right up to the edge of the page then we recommend you place it at least 5mm away from the outside edges of a page.
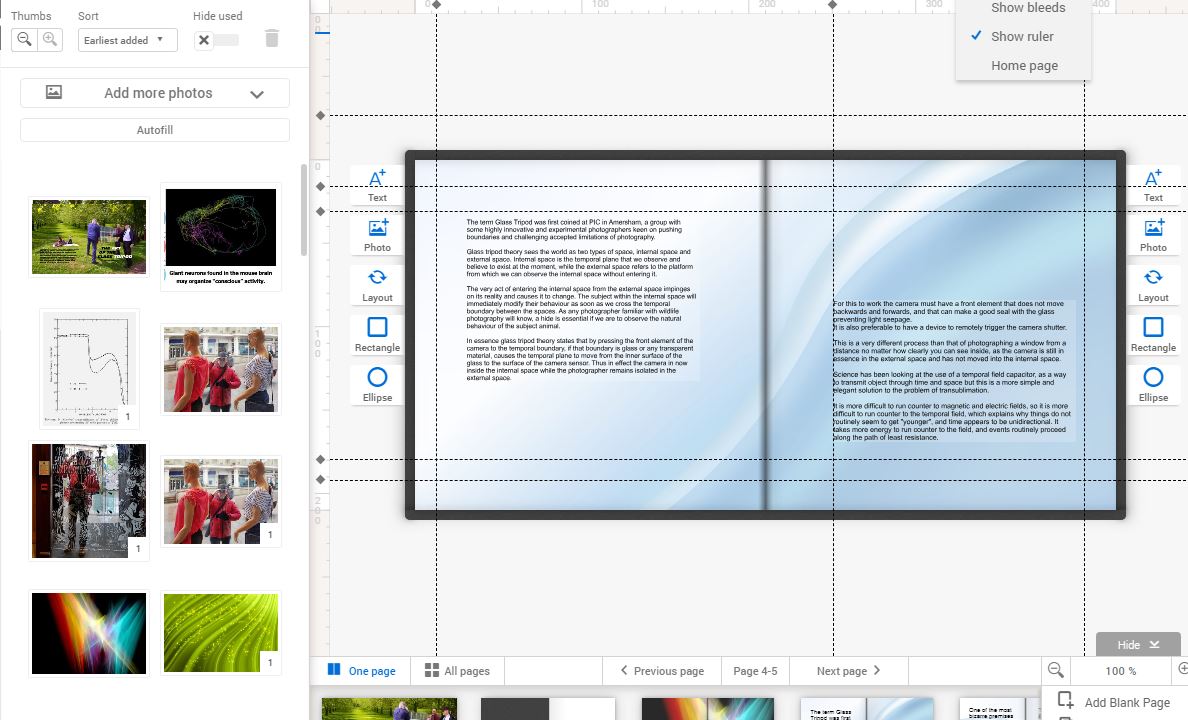
Can I add guide lines to check alignment of images across multiple pages?
Yes, you can. You will find a “Show ruler” in the top toolbar of the editor. Click on “More” and options will roll out with ruler being one of them. You can use this tool to set guide lines for your photobook or yearbook, if you are after a structured consistent design throughout or to help you design a particular spread.
Please note, the guide lines are black so if you want a black background, first work on the layout with a white background and change it to black after you are happy with your layout design.
https://youtu.be/ppXjJhpm_TY?t=1
Can I increase the view of the product I am creating in the editor?
There is a zoom function within the editor that allows you to magnify your project by up to 400%, additionally you can hide the bottom panel with the preview of your project pages.
Further, you can take advantage of the full screen view by pressing the F11 key on your keyboard (press F11 again and it will reverse the action and return to the standard window view).
How do I change position of the zoomed view of my product?
Use the slider bars on the side and bottom edge of the product-editing window to move the zoomed image.
Alternatively, you may find it easier to use ALT on your keyboard – simply press and hold down the ALT key while moving the product to the desired position.
Can I edit my background?
Yes, you can. In order to edit the background, please place the background on a page of your project and double-click it with your mouse button. A tool bar will become visible that will allow you to manipulate the look of your background. Just click on “Done” when you have finished editing it.
Placing an order
I have completed my project where do I redeem my discount code?
Once you've done your project and added it to the Cart, you can add your discount code by typing it into the "Enter discount code" text box under the name of your project in your Cart. After you've entered your code, please confirm the redemption, by clicking the "OK" button placed on the right. The total price of your order will change according to the value of your code.
Can I use more than one discount code at any one time?
It is not possible to use multiple discounts within one order. Therefore, if there more than one discount that could apply to your products, use the best deal for your order or place separate orders if ordering multiple products, so that you can maximise the saving and achieve the best possible deal.
Why did my volume-printing discount disappear after I submitted a promotional discount code?
Unfortunately, it is not possible to receive multiple discounts for a single order. Therefore, the discount code you enter manually in the cart will replace the volume discount. Always check which discount offers you a better price, to maximise your saving.
Words explained
What is a page?
By a page we mean one side of a paper leaf – therefore 1 leaf of paper consists of 2 pages.
What are the endpapers?
The endpapers or end-papers of a book (also known as endsheets) are the pages that consist of a double-size sheet folded, with one half pasted against an inside on the hardback cover (the pastedown), and the other serving as the first free page (the free endpaper or flyleaf). The front endpaper precedes the first printed page of contents, whereas the back endpapers follow the text. Our endpapers on hardback cover books are white, as standard.
What is a paperback cover?
This type of cover is often called a softback cover and basically means that, although the cover is printed on the card, it is still flexible. Our paperback covers are printed on 300gsm card and gloss laminated.
What is a laminated hardback cover?
This is a 2.18mm thick hardboard case with printed and laminated cover image wrapped over it, creating very impressive and hard wearing finish. The bound book contents is attached to the cover with endpapers.
What is a leatherette cover?
This is a 2.18mm thick hardboard case with leather-effect material stretched over it, giving the cover a premium finish. The cover then has gold or silver foil blocking applied to the front, to complete the prestige look.The bound book contents is attached to the cover with endpapers.